Total Pageviews

Friday, April 29, 2011

Launched!

Update: Now that I have had the boat in the water a few times with other kayaks I can report that the stability, speed and roomy cockpit are excellent. My only complaint might be comfort, particularly the seatback band and lack of thigh support. It certainly isnt bad but its an area that could be improved by upgrading the seat and seat back. Some of the new plastic kayaks really have a lot of comfort molded in them by comparison. Two hours is the longest I have been seated in the kayak thus far without getting out, the large cockpit size allows you to move around in the boat quite during paddle/snack breaks while in the water. I also weighed my WD10 kayak. It came in exactly at the 36 lbs the CLC catalog states it should, this is without end pours though. The WD10 is notably lighter than any molded, store bought kayak of this size.

Today I launched the kayak. Two years and two days since I first started building wood boats I now have two of them. The CLC WoodDuck10 kayak took 85 hours over 5 months calendar time. The Glen-L "Zip" 40hp runabout took 733 hours over 16.5 months. The kayak cost just over 1/10th the cost of the Zip and its just as much fun, lots of bang for the buck. I love both my boats but I bet the kayak see's more frequent use.

View all my boat building pictures on my picasa page. https://picasaweb.google.com/vupilot


Friday, April 22, 2011

3rd varnish coat finished

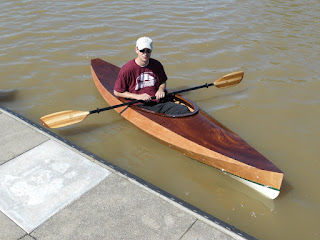
Finished the 3rd coat of varnish on the deck today. I added a little too much thinner so it was easy to leave a couple "holidays". As much as I enjoy it my brain cells need some time to detox from huffing fumes everyday. I'll launch the kayak as is, and when we get a perfect day for varnishing, I will do another coat on the deck to try and eliminate the thin spots. Im really, really pleased with the smooth, glassy finish the Epifanes varnish provides.


Thursday, April 21, 2011

Seat & Backrest. 84 hours.

The humidity has been too high to finish the varnish on the days I have been able to work on the kayak this week. So tonight I installed the seat and backrest, pretty easy, took less than an hour. The seat and backrest are included in the kit and nicer ones are available also. Im curious how comfortable this simple seat will be.


In the picture above you can see that the seat is built from two layers of foam which you need to glue together with contact cement. Mine had a chunk missing from the bottom piece. The missing chunk broke off along the outside edge and is nowhere to be found in the packaging. My only complaint about the entire kit has been the packing. I was shorted fiberglass tape, you might remember and now the seat is missing a chunk of foam, not a big deal as its hidden from view and I am sure they would send another if I emailed CLC about it but there seems to be room for improvement in the packaging quality control. Anyway...


The seatback gets straped in place and held with two screws under the aft cockpit coaming. Then two nylon straps exted forward and also screw under the coaming to support the seatback as you lean against the backrest. The seat bottom just gets contact cemented in place but I decided to just velcro it in place for now in case I want to adjust its position.


The last thing I did tonight was finish up the rack for storing my kayak. I bought a kayak wall rack from Dicks Sporting Goods but it wouldnt fit the WoodDuck. So I just made a simple rack with some 1x3 lumber screwed to my garage wall studs. I added a little pipe insulation to the edge of the 1x3 to protect the bottom paint.


Tomorrow is the only day without rain in the forecast so I hope to finish varnishing the deck.

Sunday, April 17, 2011

3rd Varnish Coat Begins. 83 hours,

Varnish is interesting stuff and all about learning the technique required and that technique will be different for each brand of varnish and for every 10 degrees different the temperature is, even the humidity changes the "feel" of each coat. It's "wet-edge" working time is about twice as long as the clear coat I used on my Glen-L "Zip" runabout which makes it a bit more forgiving. Perhaps this is mostly due to the fact the temps are a good 20 degrees cooler than when I clear coated the Zip. The first coat I applied entirely with a 3" foam brush. It worked pretty good, although I did have one run and a couple "holidays". On the second coat I experimented with rolling the varnish on, then tipping it smooth with a 3" foam brush. That produced excellent results on the sides above the green trim but I couldnt keep a "wet-edge" long enough around the cockpit coaming so that produced ugly lap marks. I also wanted to try a regular brissled brush and did so for the second interior coat and 2nd cockpit coaming coat. It worked fine but the foam brush lays a much more consistent thickness of varnish so I will stick with the foam. You'll also need to learn how to control how your varnish behaves in different atmospheric conditions. Different brands of varnish have different "solids" contents and this will also greatly effect how much thinner needs to be added. In the pics below you can see the 3rd coat of varnish applied to the sides. The deck has been sanded with 220 then 320 in prep for its 3rd coat.

I think 3 coats is all I will need if I can get this 3rd coat applied nicely. The epifanes varnish is pretty thick and gives very good coverage. In the photo below I have already applied the 3rd coat to the sides with the roll and tip method thinned 10-12%. I will let this cure then in a couple days I'll tape along the deck/side seam and do the deck seperate this time, that way I wont get another run from the deck onto the sides. The tape line will be on a wood joint line and therefore be invisible especially if the tape is pulled before the varnish hardens. I will apply the 3rd coat to the deck with a foam brush only so I can work from bow to stern and equally along the cockpit coaming to keep the all important "wet-edge" as I work aft around both sides of the cockpit. I think varnishing with the roll and tip methond would be very easy on the deck if the cockpit coaming were left un-installed until after varnishing so you didnt have to try and work around it quickly. If I ever build another wood kayak I think I would do just that.


Varnishing a kayak this size is pretty easy to do by yourself but I can imagine that doing a large boat would be difficult to keep the "wet-edge" going and not have a section skin over before you got back to it. I would think if doing the deck of a large boat it would be nice to have a second experienced varnisher so that each person could start at the bow and tackle one side of the boat working all the way aft. If I decide to sand a re-coat my Glen-L "Zip" Runabout deck, I might have to train a varnish helper by having them do the build up coats with me before the finish coat.


Hopefully I can get the varnish on the deck done and the seat and seatback done by the end of next weekend.

Monday, April 11, 2011

1st Coat of Varnish, 81 hours

When I visited the CLC shop and picked out and ordered my kayak kit they told me it would take about 80 hours to build. Wooden you know it, they were spot on. I applied my first coat of varnish on the 80th hour, so the "building" is complete and its on to "finishing".

Friday, April 8, 2011

Foot Braces Installed. 79 hours.

Installed the foot braces this morning. A little measuring, and re-measuring then a little wince as you drill a hole in the perfectly good kayak and voila! All thats left is some sanding, 3-10 coats of varnishing and the seat and seat back installation. The foot braces adjust a full 12 inches so even Mrs WoodDuckKayak will be able to paddle in comfort.

Wednesday, April 6, 2011

Coaming installation. 78 hours

Finished up the last coat on the green stripe. Now its on to installation of the cockpit coaming. I stretched a string from the center of the stern to the tip of the bow to aid in alignment. Then clamped the coaming in place and marked it so I could align it in the same spot again for the glue up. Its ready to glue now.

Sunday, April 3, 2011

Painted. 76 hours

The kayak is now painted. 2 coats of Interlux Prekote. Sanded with 220 between coats. 3 Coats of Interlux Brightsides in Hatteras off-white, rolled and tipped on, sanded with 320 between coats except the last 2nd coat was sanded with 400 in prep for the final coat. It wound up taking 3 coats.

I just applied 3 coats of RustOleum Topside in Deep Green for the stripe. I applied all three coats tonight with about an hour between each coats. I will likely sand with 400 and do one or two more coats on the stripe or maybe not, well see how it looks when it cures. Then Im going to paint some bigger scrap pieces with the Rustoleum Topside to compare to Interlux. The Rustoleum smells the best, it smells like a mix of berries and gasoline. I kinda enjoy it. :)
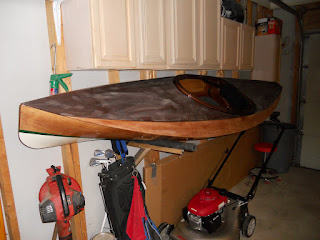
I also brought my other boat I built out of storage today and brought it home.