Thursday, March 31, 2011
First color coat. 73 hours
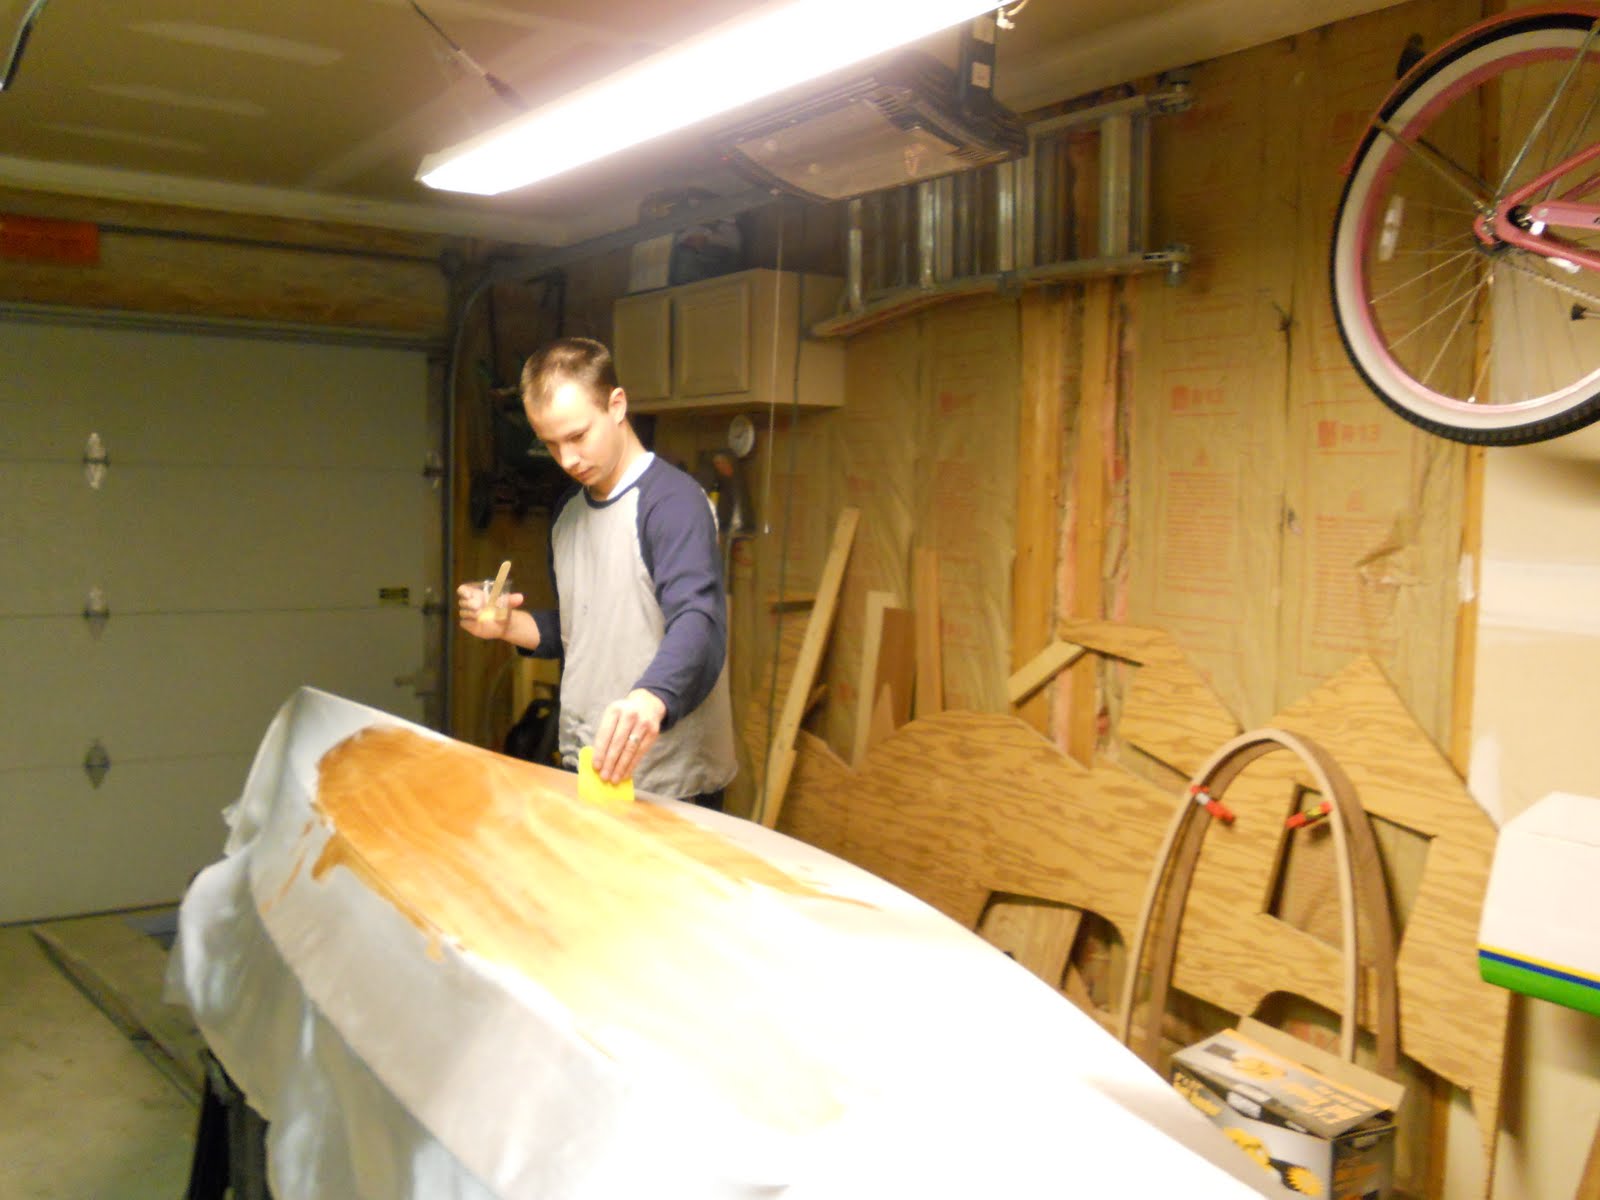
I applied the second primer coat tuesday afternoon and sanded it this morning and applied the first color coat with the Interlux paint this afternoon. I rolled the paint on with a foam roller and tipped it with a brisle brush. This Interlux Brightsides paint goes on FANTASTIC!!! Easy and smoooth. Wish I had used it on my other boat. I'll give it about 24 hours to dry then sand with 320 and do a second coat. 2 coats may be all i need. I used 4 on my other boat. If I only need two coats the higher price of Interlux would be mitigated by using less. At nearly 50$ a quart thats not exactly spare change. Oh, and the color turned out to be exactly what I was hoping it would look like. Hoping to complete the paint job by monday.
Monday, March 28, 2011
1 Primer coat. 71 hours
After lots more sanding I applied the first primer coat today. Nope, I didnt stutter, I said primer. Yup, I'm covering up that pretty wood with paint. Just how much am I covering up and what colors you ask? Not gonna tell, you'll have to wait and see. Im using Interlux PreKote primer and Interlux Brightside paint. The stripes will be done with Rustoleum TopCoat. Im very interested in how these paints compare to the other boat paint I used on my Zip. I know the Interlux will be good but how much better? Other folks have had good luck with the TopCoat from Rustoleum so I wanted to try it to increase my experience with many different brands. The appeal of Rustoleum TopCoat is that its available at Lowes for just over half the price of Interlux. Hopefully tomorrow I will be able to apply the second coat of primer. Then, first color coat hopefully by thurs. 3-4 coats of color through sunday. Finally striping early next week. When its all painted including the stripes I'll post pictures of the paint job.
Wednesday, March 23, 2011
Cockpit Coaming Assembly, 69 hours.
The past two evenings I havent felt like sanding but wanted to get something done. So I assembled the cockpit coaming.
A long time ago I read on a homebuilt airplane website, www.vansairforce.net that when undertaking long projects it doesnt matter how much actual work you do each day, only that you do SOMETHING each day and the project WILL get done...eventually. Its when you go for weeks at a time without doing anything at all that projects like this often get shelved indefinitely. So even if I spent 3 hours in the dentist chair today being poked, proded, drilled and grinded and all I want to do is sit on the couch and eat sugar to re-rot my teeth, I make it a point to at least do something on the project. This is one of those times. It only took about 15 minutes per night, the last two nights and now I have one of the few remaining components completed.

The coaming consists of two 3/8" thick plywood spacers and a oversized drip ring. The spacers need to be glued sandwiched together but must be done so while clamped in place so they cure following the curves of the decking around the cockpit. If you simply sandwiched and glued the spacers and drip ring on a flat surface they would not have any flexibility and you would break them trying to clamp them to the curved deck. In the picture above you can see I put some tape on the deck under the spacers so I wouldnt accidently glue the spacers to the deck yet. I glued and clamped the spacers and left them overnight.
 Tonight, I removed the spacers and the tape from the hull and then clamped the 1/8" thick mahogany drip ring to the spacers and it is curing tonight. In the picture above the coaming is resting upside down from how it will be installed on the deck. All I need to do is epoxy a fillet on the underside of the drip ring lip for added strength and the coaming is ready to install.
A long time ago I read on a homebuilt airplane website, www.vansairforce.net that when undertaking long projects it doesnt matter how much actual work you do each day, only that you do SOMETHING each day and the project WILL get done...eventually. Its when you go for weeks at a time without doing anything at all that projects like this often get shelved indefinitely. So even if I spent 3 hours in the dentist chair today being poked, proded, drilled and grinded and all I want to do is sit on the couch and eat sugar to re-rot my teeth, I make it a point to at least do something on the project. This is one of those times. It only took about 15 minutes per night, the last two nights and now I have one of the few remaining components completed.
The coaming consists of two 3/8" thick plywood spacers and a oversized drip ring. The spacers need to be glued sandwiched together but must be done so while clamped in place so they cure following the curves of the decking around the cockpit. If you simply sandwiched and glued the spacers and drip ring on a flat surface they would not have any flexibility and you would break them trying to clamp them to the curved deck. In the picture above you can see I put some tape on the deck under the spacers so I wouldnt accidently glue the spacers to the deck yet. I glued and clamped the spacers and left them overnight.
Tonight, I removed the spacers and the tape from the hull and then clamped the 1/8" thick mahogany drip ring to the spacers and it is curing tonight. In the picture above the coaming is resting upside down from how it will be installed on the deck. All I need to do is epoxy a fillet on the underside of the drip ring lip for added strength and the coaming is ready to install.
Monday, March 21, 2011
Fill coats & sanding, 68 hours.
This weekend I applied 4 coats of epoxy over the fiberglass to fill-in the weave. I was suprised it took so many coats. I got the best coverage using a brush instead of a foam roller but brushing also lead to some runs that will need to be sanded out.

I am now out of the MAS Epoxy that came with the kit. I still have some Poxy-Shield brand epoxy from Glen-L that I used on my other boat build. I will use the Poxy-Shield for fiberglassing the cockpit coaming and any touch ups if I happen to sand too deep.
 The epoxy resin is pretty nice looking itself. I cant wait to start varnishing! Notice the garage is open. It was 70 something degrees today, 20 degrees above average for this time a year. We even grilled and ate our dinner outside tonight. Then I started sanding.
 This is after the first pass of sanding. Gotta get all those shiny little low spots sanded out. I plan to sand from 120 up to 320 before varnishing.
I am now out of the MAS Epoxy that came with the kit. I still have some Poxy-Shield brand epoxy from Glen-L that I used on my other boat build. I will use the Poxy-Shield for fiberglassing the cockpit coaming and any touch ups if I happen to sand too deep.
 The epoxy resin is pretty nice looking itself. I cant wait to start varnishing! Notice the garage is open. It was 70 something degrees today, 20 degrees above average for this time a year. We even grilled and ate our dinner outside tonight. Then I started sanding.This is after the first pass of sanding. Gotta get all those shiny little low spots sanded out. I plan to sand from 120 up to 320 before varnishing.
Friday, March 18, 2011
Deck Fiberglassed. 64 hours
The fiberglass cured quickly on the bottom so I was able to trim the excess, sand the seams and flip the kayak over to fiberglass the deck today.
 By this evening the deck had cured enough to trim the overhanging excess fiberglass and the cockpit opening with a razor blade. I then sanded the edges and lightly scuffed the entire deck. I still had some time so I rolled on 2 coats of epoxy resin 2 hours apart to start filling the weave of the fabric. I think it will still need another coat to completely fill, then I will flip the hull over and fill the bottom fiberglass weave with resin coats. I'm getting close to running out of the supplied MAS epoxy, hopefully I have enough to fill the weave completely.
By this evening the deck had cured enough to trim the overhanging excess fiberglass and the cockpit opening with a razor blade. I then sanded the edges and lightly scuffed the entire deck. I still had some time so I rolled on 2 coats of epoxy resin 2 hours apart to start filling the weave of the fabric. I think it will still need another coat to completely fill, then I will flip the hull over and fill the bottom fiberglass weave with resin coats. I'm getting close to running out of the supplied MAS epoxy, hopefully I have enough to fill the weave completely. Thursday, March 17, 2011
Fiberglassed Hull 61 hours
 Today I fiberglassed the bottom and sides of the hull. Pretty easy going. The only tricky parts are the bow and stern.
 What I did on the bow and stern was leave plenty of excess cloth over the at the end of the left side of the kayak as pictured below and lap that around the stern and underlap the right side cloth about an inch. Then, I laid the right side cloth over the 1" underlap and I have about 2 inches of excess that I will cut it off flush with the end of the right side once it hardens. I did the same for the bow. The stern just shows this better in the pictures.
 I am very happy with the fiberglass job so far. Its one of those steps that if done well, nobody knows it is even there but if done wrong can end up looking terrible and be very difficult to fix. That makes a lot of first time builders nervous because they have never worked with fiberglass. Its really quite simple though and the instructions included in the kit are adequate for the first time fiberglasser.
Wednesday, March 16, 2011
Ready to Fiberglass, 59 hours
I've sanded the epoxy coat through 220 grit. Fixed 2 depressions that the epoxy coat highlighted. Today I laid the fiberglass cloth over the hull and smoothed it out so it can conform to the hull shape over night.

The high temp is 70 degrees tomorrow, perfect for fiberglassing. Should be fun.

Friday, March 11, 2011
Epoxy Encapsulation, 58 hours.
Today and tommorrow the temps are the warmest they will be for the next five days so tonight I encapsulated the deck and sides in epoxy. Once this cures I will flip it over and do the bottom. The temps are lower than ideal even with the electric heaters going so cure might take up to two days. I sure like the grain patterns of the dark Sapele Mahogany.


The instructions do not have this encapsulation step. They have you go ahead and lay the fiberglass and wet it out over the bare wood. My experience building my Glen-L Zip Runabout www.vupilot.blogspot.com is that the bare wood soaks up a lot of epoxy and makes it more difficult judge how much epoxy to use to wet out the fiberglass without over-doing it.
By encapsulating the kayak now the wood will soak up the fiberglass wet-out more uniformly during the fiberglassing process. To prep for fiberglass I just need to sand the encapsulation coat until it has no shine. Then it will be ready to glass. Plus, this gives you a preview of what it will look like when finished and gives you the chance to fix any trouble spots that appear before they are forever entombed in fiberglass.
Sunday, March 6, 2011
Fill and Sand and Sand...57 hours
I have been working slow on the kayak since I really would prefer temps be warmer for the next big step of fiberglassing the exterior. In the mean time here is what I have done.
I thought it would look better to fill the stitch holes from wiring the boat together. So I mixed up some epoxy and wood flour and filled the holes. There is a lot of holes! Its been chilly at night here so the epoxy took a while to cure, I didnt run the heaters much. I did the top half of the boat and 3 days later I sanded all the filler in the holes. Then, I flipped the boat over and did the bottom. Total it took about 7 days and 4 hours of actual work to fill and sand the holes.
 You can see the result in the picture below. The dark smudge areas around the filled holes are just epoxy that got down into the wood grain and that will dissapear once the entire boat gets a coat of epoxy. The actual filled holes will likely always be a little off color no matter if you fill them or not. I noticed on other completed kayak pictures that holes that were not filled and just epoxied over got very dark from the end grain showing through the clear coats within the hole, I am hoping the filler helps them to match color a little closer.
 With no temps over 50 forecast next week I will just continue sanding and rounding off all the sharp edges to a nice smooth radius. Hopefully the week after this brings a couple days with the temps in the 60's. Otherwise, I might just move the kayak to a location with 24 hour heating so I can fiberglass it. However, that would mean a fair driving distance to work on it but a less dusty, warmer shop where I dont pay the heat bill.
Subscribe to:
Comments (Atom)