Total Pageviews

Sunday, October 9, 2011

Fall Color Cruise

Today was a great day for a fall paddle. Unseasonably mild at about 78 degrees. Lots of paddlers and sailboats out today. I got a few pictures of the great fall colors, here is the best one. I sure enjoy this time of year.


There were two other homebuilt boats that I saw today. One was a homebuilt kayak of the gentlemens own design. It really looked great with a deep red/brown mahogany color throughout. I didnt get a picture of it as we passed each other. I also met this Sharpie sailer who built his sailboat from plans about 3 years ago. It looked brand new, he said he doesnt have time to get it out much.


I took a break on "Hobie Beach" which is really more dirt and rock than sand. A nice stroll to stretch after 1.5 hours paddling and enjoyed a can of iced tea. For the low, low price of 500$/yr you can "beach" your cat here too, what a deal. There is even a tiki hut and a grill.
Paddled back to the ramp and around the restaurant and called it a day. I hope the weather and my schedule coincide for at least one more paddle this year.


Sunday, August 21, 2011

Cataract Falls...made it this time.


I gave the trip to Cataract Falls another try this morning. 3.5 months ago the flooding made it so you couldnt even find the falls since they were under water. This time we are in a drought and there almost wasnt enough water. A few times my paddle hit bottom and I was in less than 1ft of water. That happened on and off for the last mile and a half before the falls. Great day for a paddle. It took almost an hour and a half to get to the falls, I paddled continuously without a break until I got there. It must be something like 5 miles one way. Its no Angel Falls but this is what we have to work with here in Indiana.


More pics.


Video


-CA


Thursday, July 7, 2011

Today was supposed to be the coolest day in the next several days so I thought I'd go for a morning paddle. I got a late start and didnt arrive until 11am and it was already very humid and no wind at all so it was pretty hot even though the air temp was only 84.
I started at the Eagle Creek Park Marina to paddle the northern half of this reservoir which I have already documented the paddle of the southern half in my first paddle report. Its 8$ to launch here. Here is a picture of the marina where I put in at just north of the halfway point of the reservoir and I will paddle north up to the creek which fills this reservoir.

The marina rents some newer pontoon boats, 9ft kayaks, canoes and some old sunfish sailboats and peddle boats. It has some drinks and snacks too. Not bad for a little park run operation.


This portion of the reservoir is home to the Indianapolis Rowing Center which hosts many national collegiate rowing championships as well as youth and adult rowing classes. It was also the rowing location for the PanAm games in the 1980's. You can see some of the 7 lanes' marker bouy's below.

This is just a shot looking south toward the 56th st bridge. It was a very calm day.


This is a picture as the reservoir narrows into the creek toward the northern most part of the reservoir. Lots of driftwood and debris floating in the water from the wet spring we had. I also saw a bald eagle near here but I couldnt get a picture of it. It swooped down from the trees and missed its fish and went right back up into the trees and I lost it.

If you have driven through Indianapolis on interstate 65 going to or from Chicago you pass right over this bridge on the northern most part of Eagle Creek reservoir.


The Lafayette Road bridge was rather low. I actually had to keep my paddle strokes low to pass through and my head had about 6" of clearance it felt like.

I got another 100 yards past the Lafayette road bridge and there was a lot of muck in the water so I decided to turn around here.


Now with this post and the previous southside of Eagle Creek post you have seen all of my home paddling grounds. From one end to the other.


Thursday, June 30, 2011

Cataract Falls attempt.

This morning I went to paddle a place I was really looking forward to paddling when I built the kayak. Cagles Mill Lake about 25 miles SW of Indianapolis is a reservoir fed by a creek which has a nice 10ft tall 50ft wide waterfall called Cataract Falls a couple miles upstream of the lake.
I decided today would be a great day to put in at the lake and paddle up there, its around a 2 or 3 mile paddle one way.
As I drove down the hill to the boat ramp I got stopped in my tracks. The road dissappeared into the lake. There is supposed to be a 200 spot parking lot and a 200' wide boat ramp just in front of those trees on the left side of what is now the lakeshore. A truck and trailer was parked beside the road so I decided to just launch from here too. There was some grass/mud on the side of the road to launch from. The lake must be a good 15ft high. I have seen it wash up the parking lot but never left the road underwater that I had seen.

About 3/4 mile into my paddle I passed a small, single lane boat ramp and its one light post in the parking lot gives an idea of the height of the water.


The high water made finding the creek that feeds the lake difficult even with my GPS on my phone. I have motorcycled to this lake often but never actually been out on it so I just kept paddling east as far as I could see. I made one wrong turn into a dead end and then "corrected" further northeast into another flooded "inlet" I paddled another half mile and couldnt make out any channel, just trees and bushes as seen below. It became obvious I was actually paddling through a flood plain that leads to nowhere instead of up a creek. In total with 2 wrong turns I paddled about a mile out of the way. So back another mile to the actual creek.


Below is where I took the wrong turn. Which way would you have turned to find the creek at the end of the lake? I turned left also. Right is the actual creek. I paddled up it about a mile and I think I saw the road to the falls coming out the woods up ahead and it looked like the falls and the parking lot nearby was all under water. So I just turned around and will do this paddle again in the fall.


I only saw 3 boats in the 3 hours I was out. Turns out the other ramps are all flooded too and only way to launch a trailer boat is by using the road where the water meets it as a launch ramp and park on the roadside. I was also told by the fisherman in the boat that launched where I did that the boats that are kept in the water in a slip are only accessable by another boat, the walkway from shore to the slips is more than 10ft underwater. Those slips are in the very far distance in the pic below and just around the bend to the left. After about 5 miles of paddling and forgetting the sunblock I didnt want to go all the way down there.


I did paddle to the rocks on the right of the above pic, here they are close-up. Im no rock-oligist err, geologist, but I suspect this is good ol Indiana Limestone.


Here is another pic that shows the height of the water. Normally the arch in a bridge is not underwater. I passed a kayak fisherman as i approached this bridge heading back to my truck and he said that this spring the water was so high they closed this bridge and thus state highway 42 that goes across it. Now THAT's some high water!!!


Its odd that the other lake I was on last week with my Glen-L Zip is only about 25 miles north of this one and it was actually below normal levels. The reservoir closest to my house is right at normal level. Weird, anyway I will have to revisit this one when its back to normal level and get pics of the falls.


Monday, May 30, 2011

Trip Report: Eagle Creek Res.

On Memorial Day morning I headed out to kayak my local waterway, Eagle Creek Resevoir. This is only 10 minutes from home and has a 9.9hp and 26' LOA limit. So its a perfect lake for paddlers, sailers and fishing from jon boats and cruising on pontoon boats. The lake is about 4 miles long and half mile wide with a couple additional inlets, the longest about half a mile. I can put in at the park marina on the north end for 5$ or at the boat launch ramp for 8$. I chose the ramp today on the southern side. If the pics wont enlarge when clicked on you can view them at www.picasaweb.google.com/vupilot/woodduckkayakbuild#


From the ramp I paddled south a quarter mile to "Ricks Cafe Boatyard" The only restaurant on the lake. There are over 100 slips for rent seasonally at the cafe.
From the cafe I paddled across the reservoir to the west, past the dam to the inlet and down the inlet to the Eagle Creek Sailing Club. Roughly a mile.
I enjoy looking at the sailboats and the names on them. The sailing club has weds evening regattas which are enjoyable to watch from the kayak or the cafe deck.Apparently THIS is where the "Fun Police" are stationed.
Personally, I like "Don't Panic" written in inverted letters. I find it somewhat humorous that people have 26' sailboats on a 4 mile long lake with a 10ft clearance bridge which makes only 2.5 miles of the lake usable to saiboats. We gotta work with what we've got here in Indiana.
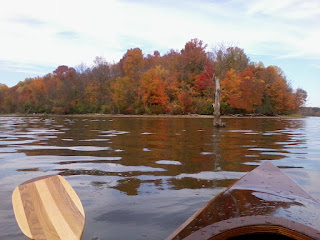
This is just a shot leaving the sailing club, out the inlet. In I few minutes I would run up to a couple of other Chesapeake Light Craft wood kayaks just entering the inlet ahead. I learned the couple were paddling a "Artic Hawk" and "Shearwater" models of touring kayak. They are much sleeker and longer than my Wood Duck and I was curious if I could keep up with them so I turned around and paddled in their direction for a minute. It seemed I was working a little harder than they were but I was able to keep pace just fine. They didnt seem interested in chatting about kayaks so I turned around and continued on. I would have liked a closer look at their yaks but just asking the models seemed to bother them.
After exciting the inlet I paddled back across the lake about a 45 degree angle toward "Hobie beach" At this point I got passed and stopped by a older guy on a really cool wooden gaff-rigged catboat about 13' long. He had been behind me pulling into the boat ramp park and was interested in my kayak. We talked for a bit about it and about his boat, after a few minutes we went on our way. I wish I would have got a picture of his boat. I continued on toward Hobie beach where for $500/season the park will give you a gate key to beach your catamaran, or dinghy sailboat here. The people appear to hangout, drink and eat more than they sail. They have a small tiki-hut bar they bring out each year, grills, picnic tables and easy up tents. There are always a few people there chilling out for the day.
I then crossed the lake again at about a 45 degree angle working farther north each time I cross. I found this cool little boat tied up infront of a really big house on the lake. It cant be but 12' long or less. It looks like a ton of fun for kids and adults. I just dont know what the brand or model is. It didnt have much of any markings on it. As I paddled down this finger in the lake a little farther there was a second one of these docked there, very cool little boats.


I then paddled across the lake again at a 45 degree angle northward, almost up to the bridge that splits the lake. Finally, I paddled into the headwind along the shore all the way back to the boat ramp. The trip lasted about 2.5 hours and I estimate I paddled 4.5 miles. This will likely be my most regular paddle since its so close to home. Next time out I will do the northern half of the lake.


Friday, April 29, 2011

Launched!

Update: Now that I have had the boat in the water a few times with other kayaks I can report that the stability, speed and roomy cockpit are excellent. My only complaint might be comfort, particularly the seatback band and lack of thigh support. It certainly isnt bad but its an area that could be improved by upgrading the seat and seat back. Some of the new plastic kayaks really have a lot of comfort molded in them by comparison. Two hours is the longest I have been seated in the kayak thus far without getting out, the large cockpit size allows you to move around in the boat quite during paddle/snack breaks while in the water. I also weighed my WD10 kayak. It came in exactly at the 36 lbs the CLC catalog states it should, this is without end pours though. The WD10 is notably lighter than any molded, store bought kayak of this size.

Today I launched the kayak. Two years and two days since I first started building wood boats I now have two of them. The CLC WoodDuck10 kayak took 85 hours over 5 months calendar time. The Glen-L "Zip" 40hp runabout took 733 hours over 16.5 months. The kayak cost just over 1/10th the cost of the Zip and its just as much fun, lots of bang for the buck. I love both my boats but I bet the kayak see's more frequent use.

View all my boat building pictures on my picasa page. https://picasaweb.google.com/vupilot


Friday, April 22, 2011

3rd varnish coat finished

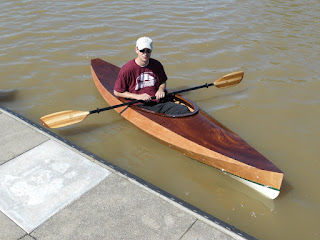
Finished the 3rd coat of varnish on the deck today. I added a little too much thinner so it was easy to leave a couple "holidays". As much as I enjoy it my brain cells need some time to detox from huffing fumes everyday. I'll launch the kayak as is, and when we get a perfect day for varnishing, I will do another coat on the deck to try and eliminate the thin spots. Im really, really pleased with the smooth, glassy finish the Epifanes varnish provides.


Thursday, April 21, 2011

Seat & Backrest. 84 hours.

The humidity has been too high to finish the varnish on the days I have been able to work on the kayak this week. So tonight I installed the seat and backrest, pretty easy, took less than an hour. The seat and backrest are included in the kit and nicer ones are available also. Im curious how comfortable this simple seat will be.


In the picture above you can see that the seat is built from two layers of foam which you need to glue together with contact cement. Mine had a chunk missing from the bottom piece. The missing chunk broke off along the outside edge and is nowhere to be found in the packaging. My only complaint about the entire kit has been the packing. I was shorted fiberglass tape, you might remember and now the seat is missing a chunk of foam, not a big deal as its hidden from view and I am sure they would send another if I emailed CLC about it but there seems to be room for improvement in the packaging quality control. Anyway...


The seatback gets straped in place and held with two screws under the aft cockpit coaming. Then two nylon straps exted forward and also screw under the coaming to support the seatback as you lean against the backrest. The seat bottom just gets contact cemented in place but I decided to just velcro it in place for now in case I want to adjust its position.


The last thing I did tonight was finish up the rack for storing my kayak. I bought a kayak wall rack from Dicks Sporting Goods but it wouldnt fit the WoodDuck. So I just made a simple rack with some 1x3 lumber screwed to my garage wall studs. I added a little pipe insulation to the edge of the 1x3 to protect the bottom paint.


Tomorrow is the only day without rain in the forecast so I hope to finish varnishing the deck.

Sunday, April 17, 2011

3rd Varnish Coat Begins. 83 hours,

Varnish is interesting stuff and all about learning the technique required and that technique will be different for each brand of varnish and for every 10 degrees different the temperature is, even the humidity changes the "feel" of each coat. It's "wet-edge" working time is about twice as long as the clear coat I used on my Glen-L "Zip" runabout which makes it a bit more forgiving. Perhaps this is mostly due to the fact the temps are a good 20 degrees cooler than when I clear coated the Zip. The first coat I applied entirely with a 3" foam brush. It worked pretty good, although I did have one run and a couple "holidays". On the second coat I experimented with rolling the varnish on, then tipping it smooth with a 3" foam brush. That produced excellent results on the sides above the green trim but I couldnt keep a "wet-edge" long enough around the cockpit coaming so that produced ugly lap marks. I also wanted to try a regular brissled brush and did so for the second interior coat and 2nd cockpit coaming coat. It worked fine but the foam brush lays a much more consistent thickness of varnish so I will stick with the foam. You'll also need to learn how to control how your varnish behaves in different atmospheric conditions. Different brands of varnish have different "solids" contents and this will also greatly effect how much thinner needs to be added. In the pics below you can see the 3rd coat of varnish applied to the sides. The deck has been sanded with 220 then 320 in prep for its 3rd coat.

I think 3 coats is all I will need if I can get this 3rd coat applied nicely. The epifanes varnish is pretty thick and gives very good coverage. In the photo below I have already applied the 3rd coat to the sides with the roll and tip method thinned 10-12%. I will let this cure then in a couple days I'll tape along the deck/side seam and do the deck seperate this time, that way I wont get another run from the deck onto the sides. The tape line will be on a wood joint line and therefore be invisible especially if the tape is pulled before the varnish hardens. I will apply the 3rd coat to the deck with a foam brush only so I can work from bow to stern and equally along the cockpit coaming to keep the all important "wet-edge" as I work aft around both sides of the cockpit. I think varnishing with the roll and tip methond would be very easy on the deck if the cockpit coaming were left un-installed until after varnishing so you didnt have to try and work around it quickly. If I ever build another wood kayak I think I would do just that.


Varnishing a kayak this size is pretty easy to do by yourself but I can imagine that doing a large boat would be difficult to keep the "wet-edge" going and not have a section skin over before you got back to it. I would think if doing the deck of a large boat it would be nice to have a second experienced varnisher so that each person could start at the bow and tackle one side of the boat working all the way aft. If I decide to sand a re-coat my Glen-L "Zip" Runabout deck, I might have to train a varnish helper by having them do the build up coats with me before the finish coat.


Hopefully I can get the varnish on the deck done and the seat and seatback done by the end of next weekend.

Monday, April 11, 2011

1st Coat of Varnish, 81 hours

When I visited the CLC shop and picked out and ordered my kayak kit they told me it would take about 80 hours to build. Wooden you know it, they were spot on. I applied my first coat of varnish on the 80th hour, so the "building" is complete and its on to "finishing".

Friday, April 8, 2011

Foot Braces Installed. 79 hours.

Installed the foot braces this morning. A little measuring, and re-measuring then a little wince as you drill a hole in the perfectly good kayak and voila! All thats left is some sanding, 3-10 coats of varnishing and the seat and seat back installation. The foot braces adjust a full 12 inches so even Mrs WoodDuckKayak will be able to paddle in comfort.

Wednesday, April 6, 2011

Coaming installation. 78 hours

Finished up the last coat on the green stripe. Now its on to installation of the cockpit coaming. I stretched a string from the center of the stern to the tip of the bow to aid in alignment. Then clamped the coaming in place and marked it so I could align it in the same spot again for the glue up. Its ready to glue now.

Sunday, April 3, 2011

Painted. 76 hours

The kayak is now painted. 2 coats of Interlux Prekote. Sanded with 220 between coats. 3 Coats of Interlux Brightsides in Hatteras off-white, rolled and tipped on, sanded with 320 between coats except the last 2nd coat was sanded with 400 in prep for the final coat. It wound up taking 3 coats.

I just applied 3 coats of RustOleum Topside in Deep Green for the stripe. I applied all three coats tonight with about an hour between each coats. I will likely sand with 400 and do one or two more coats on the stripe or maybe not, well see how it looks when it cures. Then Im going to paint some bigger scrap pieces with the Rustoleum Topside to compare to Interlux. The Rustoleum smells the best, it smells like a mix of berries and gasoline. I kinda enjoy it. :)
I also brought my other boat I built out of storage today and brought it home.

Thursday, March 31, 2011

First color coat. 73 hours

I applied the second primer coat tuesday afternoon and sanded it this morning and applied the first color coat with the Interlux paint this afternoon. I rolled the paint on with a foam roller and tipped it with a brisle brush. This Interlux Brightsides paint goes on FANTASTIC!!! Easy and smoooth. Wish I had used it on my other boat. I'll give it about 24 hours to dry then sand with 320 and do a second coat. 2 coats may be all i need. I used 4 on my other boat. If I only need two coats the higher price of Interlux would be mitigated by using less. At nearly 50$ a quart thats not exactly spare change. Oh, and the color turned out to be exactly what I was hoping it would look like. Hoping to complete the paint job by monday.

Monday, March 28, 2011

1 Primer coat. 71 hours

After lots more sanding I applied the first primer coat today. Nope, I didnt stutter, I said primer. Yup, I'm covering up that pretty wood with paint. Just how much am I covering up and what colors you ask? Not gonna tell, you'll have to wait and see. Im using Interlux PreKote primer and Interlux Brightside paint. The stripes will be done with Rustoleum TopCoat. Im very interested in how these paints compare to the other boat paint I used on my Zip. I know the Interlux will be good but how much better? Other folks have had good luck with the TopCoat from Rustoleum so I wanted to try it to increase my experience with many different brands. The appeal of Rustoleum TopCoat is that its available at Lowes for just over half the price of Interlux. Hopefully tomorrow I will be able to apply the second coat of primer. Then, first color coat hopefully by thurs. 3-4 coats of color through sunday. Finally striping early next week. When its all painted including the stripes I'll post pictures of the paint job.

Wednesday, March 23, 2011

Cockpit Coaming Assembly, 69 hours.

The past two evenings I havent felt like sanding but wanted to get something done. So I assembled the cockpit coaming.
A long time ago I read on a homebuilt airplane website, www.vansairforce.net that when undertaking long projects it doesnt matter how much actual work you do each day, only that you do SOMETHING each day and the project WILL get done...eventually. Its when you go for weeks at a time without doing anything at all that projects like this often get shelved indefinitely. So even if I spent 3 hours in the dentist chair today being poked, proded, drilled and grinded and all I want to do is sit on the couch and eat sugar to re-rot my teeth, I make it a point to at least do something on the project. This is one of those times. It only took about 15 minutes per night, the last two nights and now I have one of the few remaining components completed.

The coaming consists of two 3/8" thick plywood spacers and a oversized drip ring. The spacers need to be glued sandwiched together but must be done so while clamped in place so they cure following the curves of the decking around the cockpit. If you simply sandwiched and glued the spacers and drip ring on a flat surface they would not have any flexibility and you would break them trying to clamp them to the curved deck. In the picture above you can see I put some tape on the deck under the spacers so I wouldnt accidently glue the spacers to the deck yet. I glued and clamped the spacers and left them overnight.

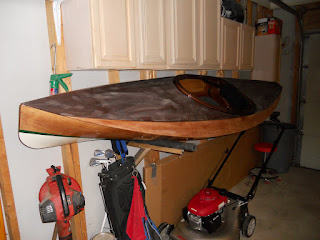
Tonight, I removed the spacers and the tape from the hull and then clamped the 1/8" thick mahogany drip ring to the spacers and it is curing tonight. In the picture above the coaming is resting upside down from how it will be installed on the deck. All I need to do is epoxy a fillet on the underside of the drip ring lip for added strength and the coaming is ready to install.

Monday, March 21, 2011

Fill coats & sanding, 68 hours.

This weekend I applied 4 coats of epoxy over the fiberglass to fill-in the weave. I was suprised it took so many coats. I got the best coverage using a brush instead of a foam roller but brushing also lead to some runs that will need to be sanded out.

I am now out of the MAS Epoxy that came with the kit. I still have some Poxy-Shield brand epoxy from Glen-L that I used on my other boat build. I will use the Poxy-Shield for fiberglassing the cockpit coaming and any touch ups if I happen to sand too deep.

The epoxy resin is pretty nice looking itself. I cant wait to start varnishing! Notice the garage is open. It was 70 something degrees today, 20 degrees above average for this time a year. We even grilled and ate our dinner outside tonight. Then I started sanding.

This is after the first pass of sanding. Gotta get all those shiny little low spots sanded out. I plan to sand from 120 up to 320 before varnishing.

Friday, March 18, 2011

Deck Fiberglassed. 64 hours

The fiberglass cured quickly on the bottom so I was able to trim the excess, sand the seams and flip the kayak over to fiberglass the deck today.

By this evening the deck had cured enough to trim the overhanging excess fiberglass and the cockpit opening with a razor blade. I then sanded the edges and lightly scuffed the entire deck. I still had some time so I rolled on 2 coats of epoxy resin 2 hours apart to start filling the weave of the fabric. I think it will still need another coat to completely fill, then I will flip the hull over and fill the bottom fiberglass weave with resin coats. I'm getting close to running out of the supplied MAS epoxy, hopefully I have enough to fill the weave completely.