Total Pageviews

Sunday, March 6, 2011

Fill and Sand and Sand...57 hours

I have been working slow on the kayak since I really would prefer temps be warmer for the next big step of fiberglassing the exterior. In the mean time here is what I have done.

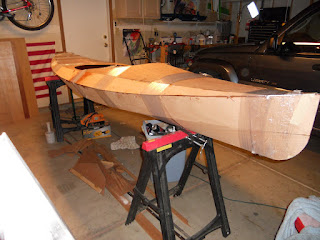
I thought it would look better to fill the stitch holes from wiring the boat together. So I mixed up some epoxy and wood flour and filled the holes. There is a lot of holes! Its been chilly at night here so the epoxy took a while to cure, I didnt run the heaters much. I did the top half of the boat and 3 days later I sanded all the filler in the holes. Then, I flipped the boat over and did the bottom. Total it took about 7 days and 4 hours of actual work to fill and sand the holes.

You can see the result in the picture below. The dark smudge areas around the filled holes are just epoxy that got down into the wood grain and that will dissapear once the entire boat gets a coat of epoxy. The actual filled holes will likely always be a little off color no matter if you fill them or not. I noticed on other completed kayak pictures that holes that were not filled and just epoxied over got very dark from the end grain showing through the clear coats within the hole, I am hoping the filler helps them to match color a little closer.

With no temps over 50 forecast next week I will just continue sanding and rounding off all the sharp edges to a nice smooth radius. Hopefully the week after this brings a couple days with the temps in the 60's. Otherwise, I might just move the kayak to a location with 24 hour heating so I can fiberglass it. However, that would mean a fair driving distance to work on it but a less dusty, warmer shop where I dont pay the heat bill.

Wednesday, February 23, 2011

Paddle, Eyestrap, Planing. 51 hours

I ordered a paddle for the Kayak monday and it arrived today. I choose the Mistrel Hybrid 240cm from Chesapeake Light Craft. It has a composite shaft and the blades are made of cedar, butternut and basswood. It also comes with drip rings. The total weight is a very light 28oz and the price is pretty reasonable for such a light weight, good looking paddle. CLC had free shipping on certain items this month so I took advantage of that and got the paddle before the sale ends at the end of Feb.
I also bought a carbon fiber eyestrap from CLC. This item is a dissapointment. It looked much bigger in the pictures online. Its made of carbon fiber and looks cool close up. In actuality the eyestrap is very small. Only a very small diameter rope will fit through its opening. At 9$ each I am glad I only bought one. I wish it was about twice the size that it is. The catalog says a friend of CLC hand makes these eyestraps. To install them the strap is simply epoxied in place.
All I have done building wise this week is plane the deck/hull junction on the exterior. There is a slight overhang in a couple spots that needed trimmed down.


Monday, February 21, 2011

50 hours. Bulkhead installed

This weekend I installed the bulkhead and sealed the aft compartment watertight with a epoxy fillet around the bulkhead. Since I decided not to install a deck hatch to the rear compartment this was a slight deviation from the plans.
I also made a fillet way up in the forward bow area all the way forward on the hull to deck joint and in the furthest aft area as well before the bulkhead install. The instructions dont say to do this but it sure gives me peace of mind that the joint wont come apart. Its difficult to get epoxy spread nicely so far forward inside the boat but it was worth the effort.

Thursday, February 17, 2011

49 hours.

This evening UPS delivered the fiberglass tape I was missing. Chesapeake Light Craft says my kit should have shipped with a full roll of the FG tape plus some extra that is hand rolled and packed with the kit. My kit slipped out the door with only the one roll. You can see the little roll of FG tape in the pic below, thats all that i needed.


I got to work right away on the port side seam. Fiberglassing this inner seam is the most uncomfortable part of the build. You have to be able to reach inside the boat as close to the ends as possible to lay the epoxy fillet and the glass in the seam. In the picture above you can see the required items for the job and some of my special hand made tools for reaching far into the boat. In the picture I am actually finished with the job, its the far left seam.
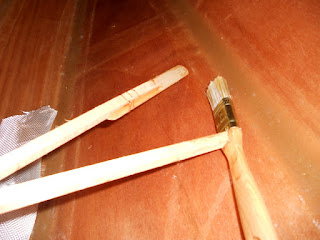

Here is a close up of my tools. Just a 1" brush and a tongue depressor glued to some sticks. Another trick the instructions show is to pre-cut the tape to length then roll it up and place the tape right into the mixed cup of epoxy to pre-soak it. Then, place the roll at the aft end of the seam and roll it out along the seam. You then only have to wet out any dry areas which means a lot less time spent with your head and arms in awkward angles reaching inside the boat. Its just messy, gloves are a must.
If this side cures fast enough, I may do the opposite side right before i go to bed tonight.

Edit: I did get the other side done tonight, glad that step is over.

Wednesday, February 16, 2011

47 hours...waiting...

Its 50 degrees outside, a beautiful day for working on the kayak in the garage. I cant do anything though. My kit must have been short stocked of fiberglass tape because i am 5 ft short of enough to fiberglass the seams of the deck/hull mating. I havent deviated from the instructions in fiberglass tape use so I must have been shorted. Annoying. I am awaiting more to be shipped to me. Bummer. I did spend an hour removing the wires and stretch wrap tape in prep for fiberglassing the joint.

Saturday, February 12, 2011

45 hours. Mating Hull and Deck

Finally, some temps above freezing. I can heat the garage without ice backing up on the gutters making ice dams. Hope to work on the kayak a lot this week, supposed to have 40-50 degree temps all week.

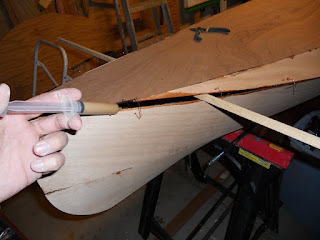
In the photo above the deck is ready to wire and tack glue to the hull. The wires are ready to pull the two halves together. The wood between the hull and deck holds them apart enough to apply the glue in the fore and aft sections where glue cant be applied from the cockpit access.
Here I am applying the epoxy to the hull in the bow area. Next, I will remove the wood spacer and twist the wires together after careful alignment.
After all the wires are twisted together I applied stretch wrap tape over the hull and deck to further secure the two together.

Saturday, February 5, 2011

Roof Ice Dams

Be careful if you heat your garage when there is snow/ice on the roof. Heating my garage this week with lots of snow/ice on the roof caused big ice dams at my gutters/soffits and the melt-water then had no place to go but seep up inder the shingles and tarpaper and has caused a couple wet spots on my ceilings. I have two puddles in my attic near the eaves of where two roof valleys come together

www.youtube.com/watch?v=8fyNHR7xXac

So until the snow/ice on my roof melts I am not heating my garage. So the kayak is on hold again.